
Counterpoint allows for multi-step transfers of multiple items between locations. To complete a transfer, you will enter and post Transfer Out and Transfer In. The multi-step transfer out/in process provides for greater audit control to send out of the From location and receive in to the To location. Counterpoint automatically reconciles any quantity discrepancies when the Transfer In is posted, using the “transfer as received” method. This means that any overages or shortages update quantities at the From location.
There is also a one step process called a Quick Transfer to move inventory from one location to another with one posting. This is most frequently used to move inventory from a storage location to a store location.
Full Transfer – Transfer Out
- Select INVENTORY → TRANSFERS → TRANSFER OUT → TRANSFER OUT ENTER
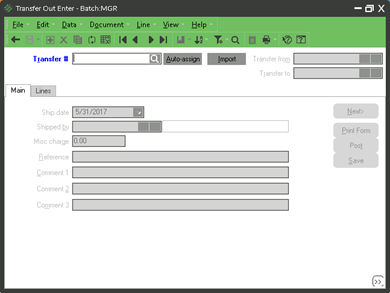
2. Enter a Transfer out number or click AUTO-ASSIGN
3. Enter or lookup the Transfer from and Transfer to Locations
4. On the LINES tab: enter, scan, or lookup the Item number
5. Enter the Transfer quantity to be transferred
6. Click ENTER or TAB
7. Repeat for all items
8. Click PRINT FORM, this will print out a ‘pick list’ of the item for your transfer
9. POST when complete
This Transfer will now be available to be received as a transfer in.
Full Transfer – Transfer In
- Select INVENTORY → TRANSFERS → TRANSFER IN → TRANSFER IN ENTER
- Click the SELECT TRANSFER button
- Select the transfer from the available list, click OK
- Select receiving mode:
Set copied lines to:
Selected: The lines on the transfer will be green, selected as being received, you can then unselect any lines that were not received
Unselected: The lines on the transfer will be pink, unselected and you will have to select the lines that re being received
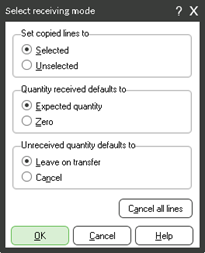
Quantity received defaults to:
Expected quantity: The quantity received will be set to the quantity transferred out (you can always change the ones that did not receive the full quantity)
Zero: The quantity will be set as 0 for all items, and you will enter the actual quantity received for each item
RECOMMENDED: Selected, Expected Quantity, Leave on Transfers
Unreceived quantity defaults to:
Leave on transfer: Any unreceived quantities will stay on the transfer
Cancel: Any unreceived quantity will be canceled from the transfer and returned to the FROM location
- Click on the LINES tab
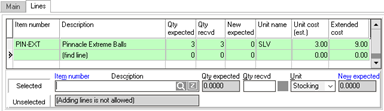
- Click on the line to edit or scan or enter the Item number or barcode to find the item on the transfer in; you can then change the status from selected to unselected, or enter a different quantity
- POST when complete


