
Did you know that your Ingenico Lane/5000 can display an image or rotating group of images? You can use this to display your company logo, ads for your goods, or ads for upcoming promotions.Keep in mind, that if you set up both methods for displaying your own images, the multiple images method will supersede the single image, and the single image will not display on your payment terminal. Therefore, i3 POS Support recommends only choosing one method to display images.
What You Need
To display these images or ads, you will need:
- Lane/5000 payment terminal(s)
- Counterpoint version 8.5.6.5+
- Image(s) that are 480×320 pixels
Displaying a Single Image/Logo
To display a single image or logo, follow these steps:
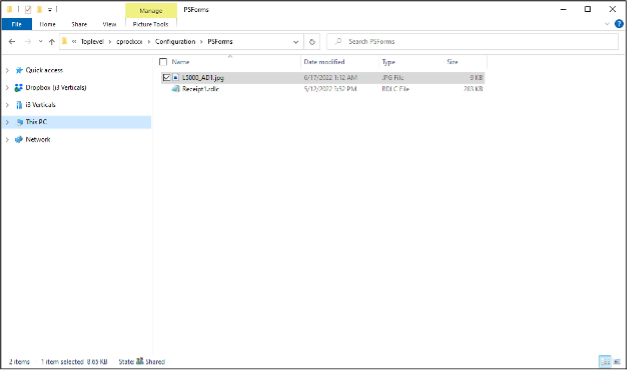
- Create a 480×320-pixel colored image that you want to display. Save the image as L5000_AD1.JPG or L5000_AD1.PNG
NOTE: If you name the file any other name, they will not display on the Lane/5000. - To make the image available to Lane/5000 EMV payment terminals copy the image file to the ConfigurationPSForms
subdirectory of your company directory (e.g., [SERVERNAME]CPSQL.1Toplevel[COMPANYNAME]ConfigurationPSForms)
NOTE: If you are using Terminal Services (RDP) to connect to Counterpoint, the file should be saved in: C:Program Files
(x86)NCRDevice Services APIDevicesUploadFolder on each computer with a Lane/5000 attached.
- On each workstation with an attached Lane/5000 payment terminal, start Counterpoint, log in to Ticket Entry or
Touchscreen Ticket Entry, or select Setup → Point of Sale → Devices - Select Device Information Test, then select Save & Close to save the device settings. This process reloads the
devices, including your custom logo and rotating ads
Displaying Multiple Images/Ads
To display multiple images or ads, follow these steps.
- Create a series of 480×320-pixel colored images you want to display in sequence. Save the images as JPG or PNG files
- On your Counterpoint server, browse to the Bin directory of your Counterpoint installation directory
([SERVERNAME]CPSQL.1Bin) - Double-click the IngenicoAdsEditor.exe file to start the Ingenico Ads Editor utility.
- From the model list box, select the L5000 (480×320 color) option
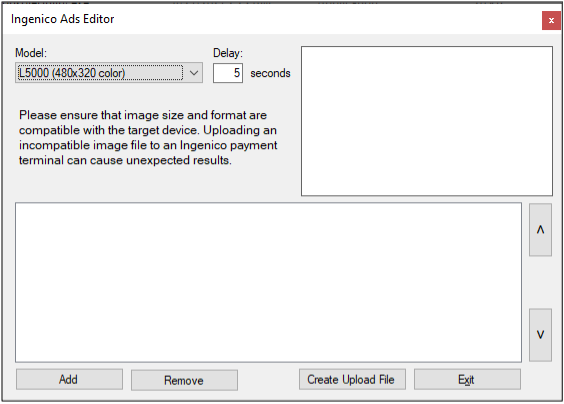
- In the Delay field, enter the number of seconds you want each image to appear before the next image in the sequence
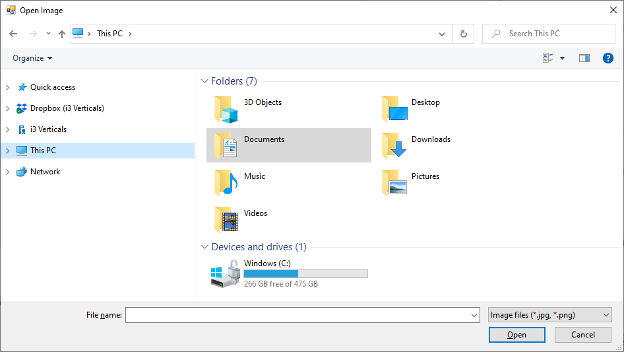
is displayed - Select the Add button, browse to the image files you created, select an image, and select Open to add the image to
the sequence. Repeat this step for each image you want to add to the sequence
- To rearrange the order of the images, select an image from the list, and then click the button to move the image up
(i.e., earlier in the sequence) or the button to move it down (i.e., later in the sequence) - To remove an image, select the image in the list and click the Remove button
- When you have added the images you want to the sequence, click the Create Upload File button, and save the upload
file in TGZ format - Save the file to the ConfigurationPSForms subdirectory of your company directory (e.g.,
[SERVERNAME]CPSQL.1Toplevel[COMPANYNAME]ConfigurationPSForms) - On each workstation with an attached Lane/5000 payment terminal, start Counterpoint, log in to Ticket Entry or
Touchscreen Ticket Entry, or select Setup → Point of Sale → Devices - Select Device Information Test, then select Save & Close to save the device settings. This process reloads the
devices, including your logo and rotating ads


