
If you would like to watch a recorded webinar of Physical
Count, click here.
Preparing for inventory:
- Make sure ALL: Tickets, receivers, RTVs, transfers and inventory adjustments are POSTED
- Run an edit list in each of areas, make sure they are empty
- POINT OF SALE → TICKETS → EDIT LIST
- INVENTORY → ADJUSTMENTS → EDIT LIST
- PURCHASING → RECEIVING → EDIT LIST
- INVENTORY → TRANSFERS → TRANSFER IN → EDIT LIST
- INVENTORY → TRANSFERS → TRANSFER OUT → EDIT LIST
- Run an edit list in each of areas, make sure they are empty
- Run an inventory valuation report. Print the last page INVENTORY → REPORTS → VALUATION
- Print an Inventory Analysis by category
- INVENTORY → REPORTS → INVENTORY ANALYSIS, select by Category (Summary)
Select ALL items, Select your location
- INVENTORY → REPORTS → INVENTORY ANALYSIS, select by Category (Summary)
- Make sure you have a current back up of your database
- Remove any old physical count records that may have been created (INVENTORY → PHYSICAL COUNT → REMOVE)
- Print your Count Area Check sheet
- Test Cipher (load lookup if applicable)
- Label your sections
- Create your physical count (INVENTORY → PHYSICAL COUNT → CREATE)
- Choose the location to create a physical count for
- Filter by category, vendor, etc for cycle counts
- Print Worksheet if desired
Counting
If using Cipher:
- Scan your section
- On the Cipher:
- Press ESC, twice to return to the main menu.
- Select UPLOAD, the screen will say “Connecting…” place in dock
- On the Computer:
- Select Shortcut to READ DATA on desktop
- Once the upload is complete, answer YES to “Do you wish to view imported records”
- Review the list to see if anything looks unusual, you should see item number, followed by qty, followed by price
- Select FILE → SAVE AS
- Enter the name for the file (section) Example: A1
- Mark off on your area checklist
- Close the read data window
- On the Cipher
- Delete Data? Select ALL DATA
- Are you sure? Select YES
- Press ESC to return to the main menu, select Collect
- Repeat for all sections
If using worksheet
- Print worksheets for desired areas (you can filter by category, sub category, vendor, etc)
- Enter your counts on the worksheet
- Select INVENTORY → PHYSICAL COUNT → ENTER
- Enter the item number
- Enter the quantity
- SAVE the record
- Repeat for all items on your worksheet
Quick Tip:
You can do a combination of importing and hand entering for your non-scannable items.
Importing
- Select INVENTORY → PHYSICAL COUNT → IMPORT
- Click the … next to file name
- Choose the file (Section) to import (Example A1.txt)
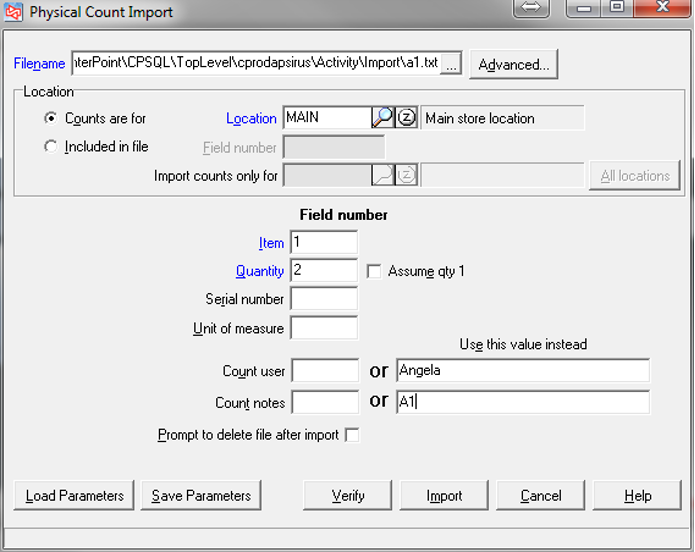
- VERIFY the location is correct
- In the Item box, type a 1
- In the Quantity box, type a 2
- Tip: Enter the counter and section for count user and count notes
- Select VERIFY (mark on Count area checklist)
- If no errors in the results move to step 8
- If errors exist, find the items that are shown as errors from that section, add item in INVENTORY → ITEM if not on file, or find correct barcode
- Select IMPORT (MARK ON COUNT AREA CHECKLIST)
- Repeat for all sections
Quick Tip:
You can do a combination of importing and hand entering for your non-scannable items
Quick Tip:
Make sure to only import each file only once or you will double your counts.
Edit List
- Select INVENTORY → PHYSICAL COUNT → EDIT LIST
- To view ALL items, select:
Frozen, Actual counts, variance and check the boxes for Include uncounted items and print variances for uncounted items
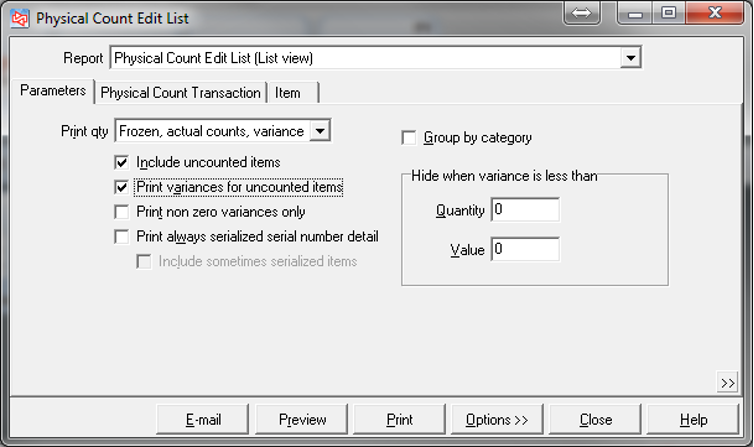
To only view items with a variance, also select Print non zero variances only: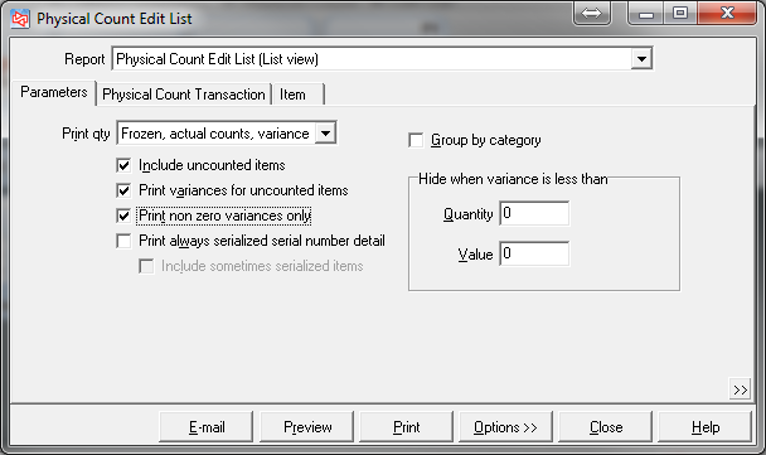
- OPTIONAL: Select Group by Category to view your report by category
OPTIONAL: Enter a Quantity to hide when the variance is less than (Ex only show items where the variance is greater than 5) - Review your edit list. Recount and ENTER new quantities for anything you find that is incorrect, review your edit list as much as you need to until you are satisfied.
Posting
After you are satisfied with your edit list, you will need to post your physical count
- Select INVENTORY → PHYSICAL COUNT → POST
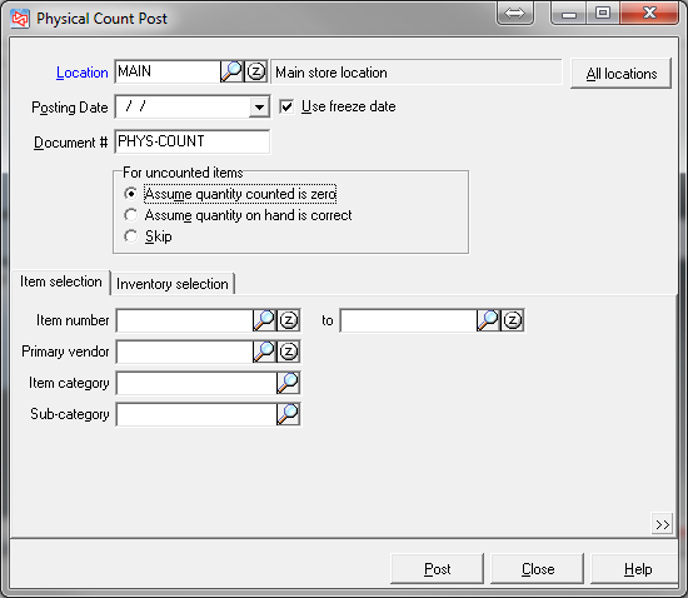
- For uncounted items, select “Assume quantity counted is zero”
- Click POST
This will take some time depending on the number of items you have. When you are done, the physical count journal will be displayed. Print the last page for your variance. - Run an inventory valuation report. Print the last page
- INVENTORY → REPORTS → VALUATION
- Print an Inventory Analysis by category
- INVENTORY → REPORTS → INVENTORY ANALYSIS, SELECT BY CATEGORY (SUMMARY)
Quick Tip:
Anything that was on your edit list that showed **uncounted** will be set to 0.
Quick Tip:
The variance report will be the difference between the Valuation and Inventory Analysis before inventory and after inventory.


