
The Physical Count process is essential to keeping an accurate inventory, but it can be time-consuming. Cycle Counts are physical counts for subsets of items. For example, rather than counting all items within your store, you can count one category of items at a time. By only counting a portion of your inventory, the count process should be significantly shorter.
Defining Count Scope
Before beginning your count think about the group(s) of items you plan to count. Do the items have something in common? Do they fall in a category or a few categories? Do they come from one primary vendor? Multiple vendors?
Pre-Count Steps
1. Make sure Tickets, Receivers, RTVs, Transfers and Inventory Adjustments are POSTED for the items you intend to count
a. Run an edit list for each of these areas, filtered for the appropriate items, and make sure they are empty
I. Point of sale → Tickets Ticket Edit List
II. INVENTORY → ADJUSTMENTS → INVENTORY ADJUSTMENT EDIT LIST
III. PURCHASING → RECEIVING → RECEIVING EDIT LIST
IV. INVENTORY → TRANSFERS → TRANSFER IN → TRANSFER IN EDIT LIST
V. INVENTORY → TRANSFERS → TRANSFER OUT → TRANSFER OUT EDIT LIST
VI. INVENTORY → QUICK TRANSFERS → QUICK TRANSFER EDIT LIST
2. Run an inventory valuation report
a. INVENTORY → REPORTS → VALUATION REPORT
I. Filter for your location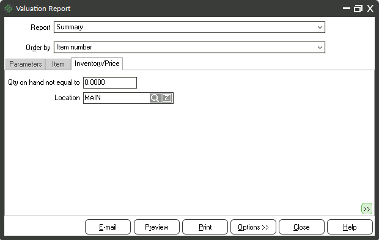
II. Filter for the items to be counted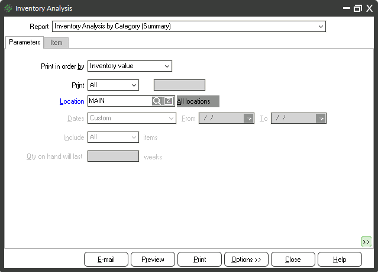
III. Print the last page of the report3. Print an Inventory Analysis by category
a. INVENTORY → REPORTS → INVENTORY ANALYSIS REPORT
I. Select by Category (Summary)
II. Select ALL items
III. Select your Location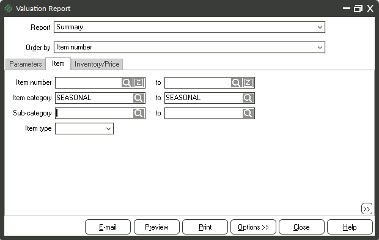
IV. Filter for the items to be counted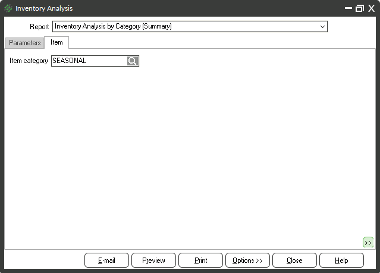
V. Print the report
4. Make sure you have a current back up of your database
5. Remove any old physical count records that may have been created
a. INVENTORY → PHYSICAL COUNT → PHYSICAL COUNT REMOVE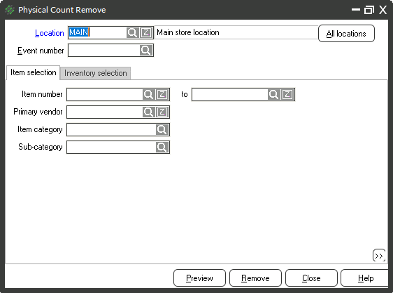
b. CLICK REMOVE
6. Print your Count Area Check sheet
7. Label the sections that you will count to match your count checklist
Creating the Count
1. Create your physical count
a. INVENTORY → PHYSICAL COUNT → PHYSICAL COUNT CREATE
I. Choose the location to create a physical count for
II. Filter by category, vendor, etc…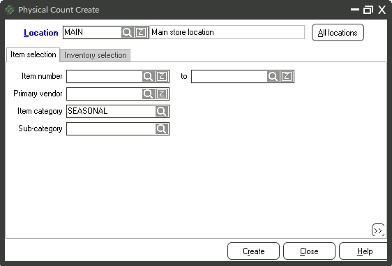
III. Click Create
Counting
If using worksheet
1. Print worksheets for desired areas (you can filter by category, subcategory, primary vendor, etc.)
2. Write your counts on the worksheet
3. Select INVENTORY → PHYSICAL COUNT → PHYSICAL COUNT ENTER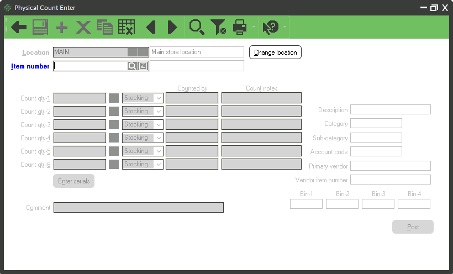
4. Enter the Item number
5. Enter the Quantity
6. SAVE the record
DO NOT CLICK POST FROM THE ENTER WINDOW!
7. Repeat for all items on your worksheet
If using Cipher
1. Scan your section
2. On the Cipher:
a. Press ESC, twice to return to the main menu.
b. Select UPLOAD, the screen will say “Connecting…” place in dock
3. On the Computer:
a. Select Shortcut to READ DATA on desktop
b. Once the upload is complete, answer YES to “Do you wish to view imported records?”
c. Review the list to see if anything looks unusual, you should see item number, followed by qty, followed by a price
d. Select FILE SAVE AS
e. Enter the name for the file (section) Example: A1
f. Mark off on your area checklist
g. Close the read data window
4. On the Cipher:
a. Delete Data? Select ALL DATA
b. Are you sure? Select YES
c. Press ESC to return to the main menu, select Collect
5. Repeat for all sections
Importing Data
Importing data is a step for those using either the Cipher or a third-party counting company (such as RGIS). The import file must either be in a .txt or .csv format to be imported into Counterpoint. The Cipher file is saved as a .txt file, but the third party’s file might be in another format. If you are concerned about the file format, reach out to Counterpoint support by emailing [email protected].1. Select INVENTORY → PHYSICAL COUNT → PHYSICAL COUNT IMPORT
2. Click the … next to file name
3. Choose the file (Section) to import (Example A1.txt)
4. Verify the location is correct
5. In the Item box, type 1
6. In the Quantity box, type 2
- Tip: Enter the counter and section for count user and count notes
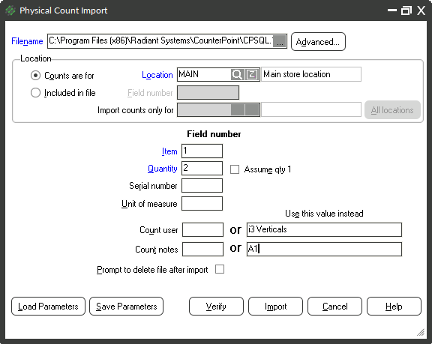
7. Select VERIFY (mark on Count area checklist)
a. If no errors in the results, move to step 8
b. If errors exist, find the items that are shown as errors from that section, add item in INVENTORY → ITEMS if not on file, or find correct barcode
8. Select IMPORT (CHECK LINE ON COUNT AREA CHECKLIST)
9. Repeat for all sections
Edit List
The Physical Count Edit List is a report of the unposted physical count. You can use it to find potential count errors or miscounts. It is a best practice to run the edit list report periodically throughout your count in order to check on your progress and review items with high variances, which are items where the expected quantity differs from the counted quantity.
To access the edit list:
- Select Inventory → Physical Count → PHYSICAL COUNT Edit List
- Enter parameters and filters (example parameters below)
- Preview the report and review for errors and miscounts
- Add additional counts by:
- Enter more counts from INVENTORY → PHYSICAL COUNT → PHYSICAL COUNT ENTER
- Capture more counts using the Cipher and upload and import them into Counterpoint
- Re-run the edit list and review for more errors
To Report on All Items
1. To view ALL ITEMS
a. Choose Frozen, Actual counts, variance from the Print qty drop-down
b. Check the boxes for:
I. Include uncounted Items
II. print variances for uncounted items
c. (Optional) Check the box to Group by Category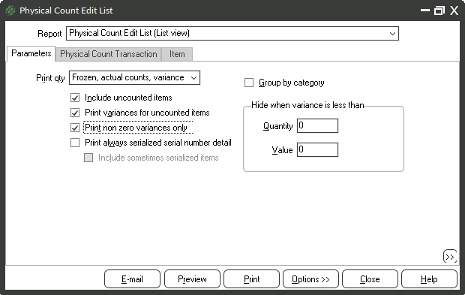
To Report on All Items with Variances
1. To view ITEMS WITH VARIANCES
a. Choose Frozen, Actual counts, variance from the Print qty drop-down
b. Check the boxes for:
I. Include uncounted Items
II. Print variances for uncounted items
III. print non-zero variances only
c. (Optional) Check the box to Group by Category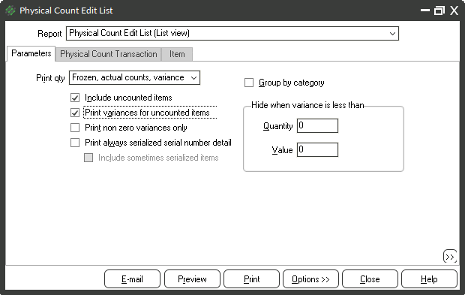
To Report on Items with High Variances
1. To view ITEMS WITH HIGH VARIANCES
a. Choose Frozen, Actual counts, variance from the Print qty drop-down
b. Check the boxes for:
I. Include uncounted Items
II. Print variances for uncounted items
III. print non-zero variances only
c. (Optional) Check the box to Group by Category
d. Enter a variance filter, by filling in:
I. A Quantity
II. A dollar value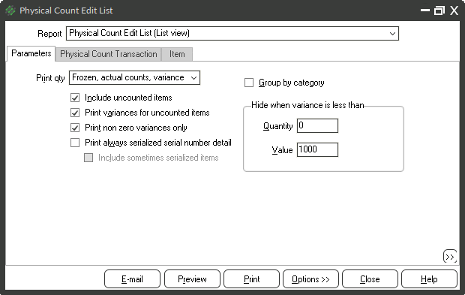

Posting
After you are satisfied with your edit list, you will need to post your physical count
1. Select Inventory → Physical Count → Physical Count Post
2. For uncounted items, select Assume quantity counted is zero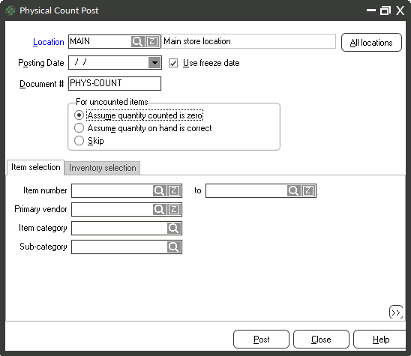
3. Click Post
This will take some time depending on the number of items you have. When you are done, the physical count journal will be displayed. Print the last page for your variance.
4. Run an Inventory Valuation Report
a. inventory → reports → Valuation report
I. Filter for your location
II. filter for the items to be counted
III. print the last page of the report
5. Print an Inventory Analysis by category
a. inventory → reports → inventory analysis report
i. Select by Category (Summary)
ii. Select ALL items
iii. Select your Location
iv. Filter for the items to be counted
v. Print the report
Best Practices
- Count on a less busy day of the week
- Assign jobs to segment the work and prevent dual entry
- One person assigned to count inventory in a section
- One person assigned to import data into Counterpoint
- Start small, a smaller count is easier to accomplish
- Do not create the count until you are ready to begin counting
- Use the checklist and do not forget to check off the step as soon as you have completed it
- Check the edit list often using different parameters
- Find a spot to put items that will not scan or were not found when importing
- Deal with these during downtime or at the end of the count
Count Area Checklist
| Section | Counted By | Uploaded | Verified | Imported | Records |
|---|---|---|---|---|---|
| A1 | |||||
| A2 | |||||
| A3 | |||||
| A4 | |||||
| A5 | |||||
| A6 | |||||
| A7 | |||||
| A8 | |||||
| A9 | |||||
| B1 | |||||
| B2 | |||||
| B3 | |||||
| B4 | |||||
| B5 | |||||
| B6 | |||||
| B7 | |||||
| B8 | |||||
| B9 | |||||
| C1 | |||||
| C2 | |||||
| C3 | |||||
| C4 | |||||
| C5 | |||||
| C6 | |||||
| C7 | |||||
| C8 | |||||
| C9 | |||||
| D1 | |||||
| D2 | |||||
| D3 | |||||
| D4 | |||||
| D5 | |||||
| D6 | |||||
| D7 | |||||
| D8 | |||||
| D9 |


