Occasionally it might be necessary to change an item to an Inventory or Non-Inventory type item.
Changing a Non-Inventory Item to an Inventory Item:
To change an item, it must not be on any unposted documents (tickets)
1. Go to INVENTORY → ITEMS
2. Enter or lookup the Item number
3. Click on the INVENTORY button at the bottom of the window
![]()
4. DELETE all inventory records
a. Select the navigation arrow to the right to select the inventory record ![]()
b. Click the X to delete 
c. Repeat until all inventory records are deleted
5. CLOSE the inventory window

6. Change the item type from Non-Inventory to Inventory in the top right of the window
7. SAVE the item 
8. Enter or lookup the Item number
9. Click on the INVENTORY button again
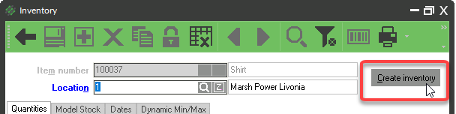
10. Click CREATE INVENTORY
11. Adjust or receive any quantities
Change an Inventory Item to a Non-Inventory Item
To change an item from Inventory to Non-Inventory, it must not be on any unposted documents (tickets) and the quantity on hand is zero.
1. Item quantity on hand must be zero (0); make any inventory adjustments as necessary
2. Go to INVENTORY → ITEMS
3. Enter or lookup the Item number
4. Click on the inventory button at the bottom of the window
![]()
5. DELETE all inventory records
a. Select the navigation arrow to the right to select the inventory record ![]()
b. Click the X to delete
c. Repeat until all inventory records are deleted
6. CLOSE the inventory window
7. Change the item type from Inventory to Non-inventory in the top right of the window
8. SAVE the item
9. Enter or lookup the Item number
10. Click on the INVENTORY BUTTON again
11. Click CREATE INVENTORY